Tutorial Hyperledger Fabric SDK Go: Comment construire votre première application ?
Ce tutoriel vous présentera le SDK Hyperledger Fabric Go et vous permettra de construire une application simple en utilisant le principe de la blockchain.
Ce tutoriel utilise Hyperledger Fabric version 1.1.0, sur le github de Heroes-Service utilisez la branche 1.1.0!
Ceci est la première partie de ce tutoriel. Les fonctionnalités de base du SDK seront montrées, mais la deuxième partie est prévue pour démontrer une application plus complexe.
- Prérequis
- Introduction à Hyperledger Fabric
- Guide d'installation
- Création de votre premier réseau blockchain
- Utilisation de Fabric SDK Go
- Faire tout ceci dans une application web
- Références
1. Prérequis
Ce tutoriel ne va pas expliquer en détail comment fonctionne Hyperledger Fabric. Je vais juste donner quelques conseils pour comprendre le comportement général du framework. Si vous voulez obtenir une explication complète de l’outil, consultez la documentation officielle, il y a beaucoup de travail là-bas qui explique quel genre de blockchain Hyperledger Fabric est.
Ce tutoriel a été réalisé sur Ubuntu 16.04 mais le framework Hyperledger Fabric est compatible avec Mac OS X, Windows et d’autres distributions Linux.
Nous utiliserons le langage Go pour concevoir notre première application car Hyperledger Fabric a été codé dans ce langage, et car il est vraiment simple à utiliser. En outre, le chaincode (contrat intelligent) peut être écrit en Go également. Ainsi, le full-stack sera uniquement en Go! Génial non ? Cependant, si vous avez la phobie de ce langage, il existe d’autres SDK comme NodeJS, Java ou Python mais nous n’en parlerons pas ici.
Hyperledger Fabric utilise Docker pour déployer facilement un réseau blockchain. En outre, certains composants (pairs) déploient également des conteneurs docker pour séparer les données (canal). Assurez-vous donc que votre plateforme supporte ce type de virtualisation.
2. Introduction to Hyperledger Fabric
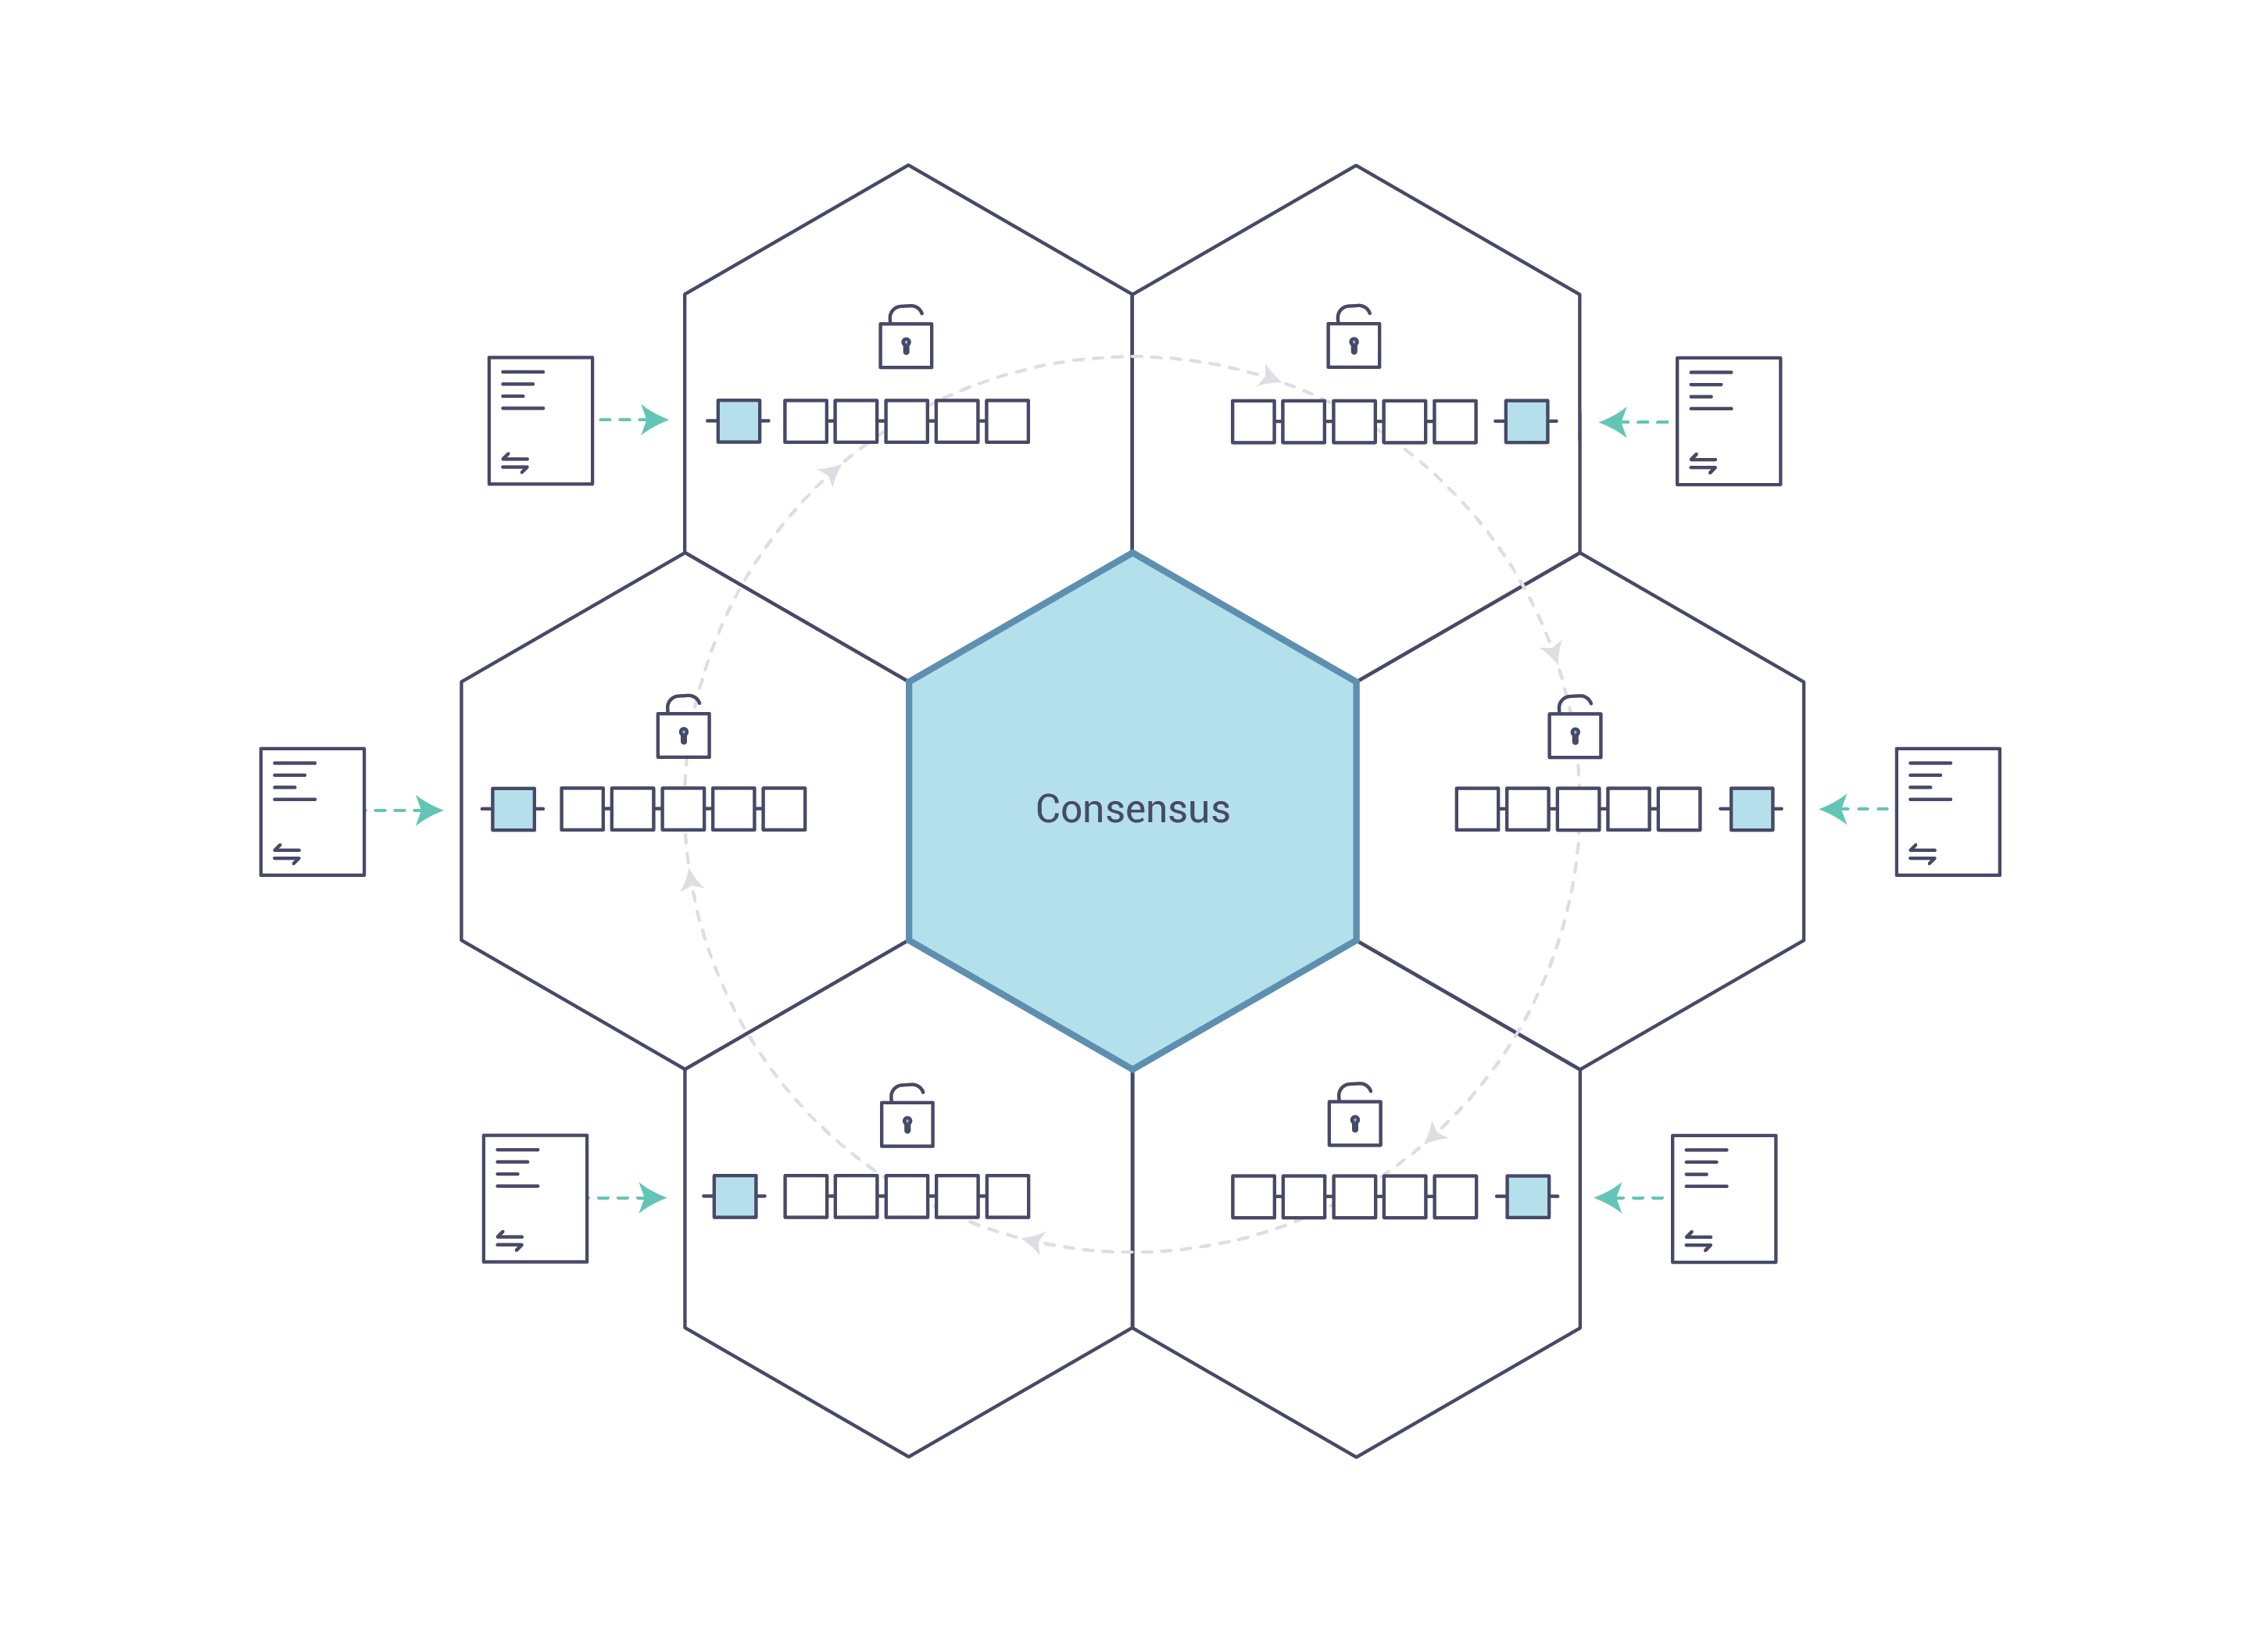
Hyperledger Fabric est une plate-forme de solutions ledger distribuées reposant sur une architecture modulaire offrant des degrés élevés de confidentialité, de résilience, de flexibilité et d’évolutivité. Elle est conçue pour soutenir la mise en œuvre de différents composants et tenir compte de la complexité et des subtilités qui existent dans l’écosystème économique.
Voir l’explication complète de la documentation officielle, dans la partie introduction : Hyperledger Fabric Blockchain
3. Guide d'installation
Ce tutoriel a été fait sur Ubuntu 16.04, mais il y aussi des aides pour Windows, Mac OS X et d’autres utilisateurs de distributions Linux.
a. Docker
La version 17.03.0-ce de Docker ou plus est requise.
Linux (Ubuntu)
Tout d’abord, afin d’installer Docker correctement, nous devons installer ses dépendances :
sudo apt install apt-transport-https ca-certificates curl software-properties-commonUne fois les dépendances installées, nous pouvons installer Docker :
curl -fsSL https://download.docker.com/linux/ubuntu/gpg | sudo apt-key add - && \
sudo add-apt-repository "deb [arch=amd64] https://download.docker.com/linux/ubuntu $(lsb_release -cs) stable" && \
sudo apt update && \
sudo apt install -y docker-ce
Maintenant nous devons gérer l’utilisateur courant pour éviter d’utiliser les droits d’administration (root) quand nous utiliserons la commande docker. Pour ce faire, il faut ajouter l’utilisateur courant au groupe docker :
sudo groupadd docker ; \
sudo gpasswd -a ${USER} docker && \
sudo service docker restart
Ne faites pas attention si l'erreur groupadd: group 'docker' already exists apparaît.
Pour appliquer les modifications, vous devez vous déconnecter et vous reconnecter. Vous pouvez ensuite vérifier votre version avec :
docker -v
Mac OS X
Téléchargez et installez le dernier pack Docker.dmg pour Mac OS X disponible sur le site web de Docker. Cela installera docker-compose aussi, et vous pourrez sauter l’étape suivante.
Linux (pas Ubuntu)
Checkez les liens ci-dessous:
Windows
Lisez les instructions sur le site de Docker : docker.com/docker-for-windows
b. Docker Compose
La version 1.8 de Docker-compose ou plus est requise.
Nous sommes actuellement incapables de gérer facilement plusieurs conteneurs à la fois. Pour résoudre ce problème, nous avons besoin de docker-compose.
Linux
L'installation est plutôt rapide :
sudo curl -L https://github.com/docker/compose/releases/download/1.21.2/docker-compose-$(uname -s)-$(uname -m) -o
/usr/local/bin/docker-compose && \
sudo chmod +x /usr/local/bin/docker-compose
Appliquez ces changements en vous déconnectant/reconnectant puis vérifiez la version avec :
docker-compose version
Windows / Autres
Lisez les instructions sur le site de Docker-compose : docs.docker.com/compose/install
c. Go
La version 1.9.x de Go ou plus est requise.
Linux
Vous pouvez soit suivre les instructions de golang.org, soit utiliser ces commandes génériques qui vont installer Golang 1.9.2 et préparer votre environnement (générer votre GOPATH) pour Ubuntu :
wget https://storage.googleapis.com/golang/go1.9.2.linux-amd64.tar.gz && \
sudo tar -C /usr/local -xzf go1.9.2.linux-amd64.tar.gz && \
rm go1.9.2.linux-amd64.tar.gz && \
echo 'export PATH=$PATH:/usr/local/go/bin' | sudo tee -a /etc/profile && \
echo 'export GOPATH=$HOME/go' | tee -a $HOME/.bashrc && \
echo 'export PATH=$PATH:$GOROOT/bin:$GOPATH/bin' | tee -a $HOME/.bashrc && \
mkdir -p $HOME/go/{src,pkg,bin}
Pour s’assurer que l’installation a fonctionné, vous pouvez vous déconnecter/reconnecter (à nouveau) et exécuter :
go version
Windows / Mac OS X / Autres
Lisez les instructions sur le site Golang: golang.org/install
4. Création de votre premier réseau blockchain
a. Préparation de l'environnement
Afin de créer un réseau blockchain, nous utiliserons docker pour construire des machines virtuelles qui géreront différents rôles. Dans ce tutoriel, nous allons rester aussi simple que possible. Hyperledger Fabric a besoin de beaucoup de certificats pour assurer le chiffrement tout au long du processus (TSL, authentifications, blocs de signature…). La création de ces fichiers nécessite un peu de temps et pour aller directement au cœur du sujet, nous avons déjà préparé tout cela pour vous dans le dossier fixtures de ce dépôt.
Créez un nouveau répertoire dans le dossier src de votre GOPATH, en utilisant notre nom de dépôt :
mkdir -p $GOPATH/src/github.com/chainHero/heroes-service && \
cd $GOPATH/src/github.com/chainHero/heroes-service
Pour récupérer le dossier fixtures, vous pouvez soit suivre cette ligne de commande, qui installera et utilisera subversion pour obtenir le dossier de ce dépôt. Ou téléchargez le fichier zip à partir de Github et extrayez uniquement le dossier fixtures.
sudo apt install -y subversion && \
cd $GOPATH/src/github.com/chainHero/heroes-service && \
svn checkout https://github.com/chainHero/heroes-service/branches/v1.1.0/fixtures &&
rm -rf fixtures/.svn
Parallèlement, si vous voulez savoir comment construire ce dossier fixture et apprendre comment créer le réseau blockchain, suivez ce tutoriel rapide sur comment construire votre premier réseau.
b. Test
Afin de vérifier si le réseau fonctionne, nous utiliserons docker-compose pour démarrer ou arrêter tous les conteneurs en même temps. Allez dans le dossier fixtures et exécutez :
cd $GOPATH/src/github.com/chainHero/heroes-service/fixtures && \
docker-compose up
Vous verrez beaucoup de logs de différentes couleurs (pour information, le rouge ne signifie pas qu'il y a des erreurs).
Ouvrez un nouveau terminal et exécutez :
docker ps
Vous verrez : deux pairs, le client et un conteneur CA. Vous avez réussi à créer un nouveau réseau prêt à être utilisé avec le SDK. Pour arrêter le réseau, revenez au terminal précédent, appuyez sur Ctrl+C et attendez que tous les conteneurs soient arrêtés. Si vous voulez explorer plus en profondeur, suivez notre tutoriel dédié à la partie réseau ici ou consultez la documentation officielle à ce sujet : Building Your First Network
Astuce : lorsque le réseau est arrêté, tous les conteneurs utilisés restent accessibles. C’est très utile pour vérifier les logs par exemple. Vous pouvez les voir avec docker ps -a. Pour nettoyer ces conteneurs, vous devez les supprimer avec docker rm $(docker ps -aq) ou si vous avez utilisé un fichier docker-compose, allez où est ce fichier et lancez docker-compose down.
Astuce : vous pouvez lancer la commande docker-compose en arrière-plan pour garder l’invite. Pour ce faire, utilisez le paramètre -d, comme ceci : docker-compose up -d. Pour arrêter les conteneurs, exécutez dans le même dossier où se trouve docker-compose.yaml, la commande : docker-compose stop (ou docker-compose down pour nettoyer après que tous les conteneurs sont arrêtés).
5. Utilisation de Fabric SDK Go
a. Configuration
Notre application a besoin de beaucoup de paramètres, en particulier les adresses des composants de Fabric pour communiquer. Nous allons tout mettre dans un nouveau fichier de configuration, la configuration de Fabric SDK Go et nos paramètres personnalisés. Pour le moment, nous allons seulement essayer de faire fonctionner le Fabric SDK Go avec le chaincode par défaut :
cd $GOPATH/src/github.com/chainHero/heroes-service && \
vi config.yaml
name: "heroes-service-network"
#
# Schema version of the content. Used by the SDK to apply the corresponding parsing rules.
#
version: 1.0.0
#
# The client section used by GO SDK.
#
client:
# Which organization does this application instance belong to? The value must be the name of an org
# defined under "organizations"
organization: org1
logging:
level: info
# Global configuration for peer, event service and orderer timeouts
# if this this section is omitted, then default values will be used (same values as below)
# peer:
# timeout:
# connection: 10s
# response: 180s
# discovery:
# # Expiry period for discovery service greylist filter
# # The channel client will greylist peers that are found to be offline
# # to prevent re-selecting them in subsequent retries.
# # This interval will define how long a peer is greylisted
# greylistExpiry: 10s
# eventService:
# # Event service type (optional). If not specified then the type is automatically
# # determined from channel capabilities.
# type: (deliver|eventhub)
# the below timeouts are commented out to use the default values that are found in
# "pkg/fab/endpointconfig.go"
# the client is free to override the default values by uncommenting and resetting
# the values as they see fit in their config file
# timeout:
# connection: 15s
# registrationResponse: 15s
# orderer:
# timeout:
# connection: 15s
# response: 15s
# global:
# timeout:
# query: 180s
# execute: 180s
# resmgmt: 180s
# cache:
# connectionIdle: 30s
# eventServiceIdle: 2m
# channelConfig: 30m
# channelMembership: 30s
# discovery: 10s
# selection: 10m
# Root of the MSP directories with keys and certs.
cryptoconfig:
path: ${GOPATH}/src/github.com/chainHero/heroes-service/fixtures/crypto-config
# Some SDKs support pluggable KV stores, the properties under "credentialStore"
# are implementation specific
credentialStore:
path: /tmp/heroes-service-store
# [Optional]. Specific to the CryptoSuite implementation used by GO SDK. Software-based implementations
# requiring a key store. PKCS#11 based implementations does not.
cryptoStore:
path: /tmp/heroes-service-msp
# BCCSP config for the client. Used by GO SDK.
BCCSP:
security:
enabled: true
default:
provider: "SW"
hashAlgorithm: "SHA2"
softVerify: true
level: 256
tlsCerts:
# [Optional]. Use system certificate pool when connecting to peers, orderers (for negotiating TLS) Default: false
systemCertPool: false
# [Optional]. Client key and cert for TLS handshake with peers and orderers
client:
keyfile:
certfile:
#
# [Optional]. But most apps would have this section so that channel objects can be constructed
# based on the content below. If an app is creating channels, then it likely will not need this
# section.
#
channels:
# name of the channel
chainhero:
# Required. list of orderers designated by the application to use for transactions on this
# channel. This list can be a result of access control ("org1" can only access "ordererA"), or
# operational decisions to share loads from applications among the orderers. The values must
# be "names" of orgs defined under "organizations/peers"
# deprecated: not recommended, to override any orderer configuration items, entity matchers should be used.
# orderers:
# - orderer.example.com
# Required. list of peers from participating orgs
peers:
peer0.org1.hf.chainhero.io:
# [Optional]. will this peer be sent transaction proposals for endorsement? The peer must
# have the chaincode installed. The app can also use this property to decide which peers
# to send the chaincode install request. Default: true
endorsingPeer: true
# [Optional]. will this peer be sent query proposals? The peer must have the chaincode
# installed. The app can also use this property to decide which peers to send the
# chaincode install request. Default: true
chaincodeQuery: true
# [Optional]. will this peer be sent query proposals that do not require chaincodes, like
# queryBlock(), queryTransaction(), etc. Default: true
ledgerQuery: true
# [Optional]. will this peer be the target of the SDK's listener registration? All peers can
# produce events but the app typically only needs to connect to one to listen to events.
# Default: true
eventSource: true
peer1.org1.hf.chainhero.io:
policies:
#[Optional] options for retrieving channel configuration blocks
queryChannelConfig:
#[Optional] min number of success responses (from targets/peers)
minResponses: 1
#[Optional] channel config will be retrieved for these number of random targets
maxTargets: 1
#[Optional] retry options for query config block
retryOpts:
#[Optional] number of retry attempts
attempts: 5
#[Optional] the back off interval for the first retry attempt
initialBackoff: 500ms
#[Optional] the maximum back off interval for any retry attempt
maxBackoff: 5s
#[Optional] he factor by which the initial back off period is exponentially incremented
backoffFactor: 2.0
#
# list of participating organizations in this network
#
organizations:
org1:
mspid: org1.hf.chainhero.io
cryptoPath: peerOrganizations/org1.hf.chainhero.io/users/{userName}@org1.hf.chainhero.io/msp
peers:
- peer0.org1.hf.chainhero.io
- peer1.org1.hf.chainhero.io
# [Optional]. Certificate Authorities issue certificates for identification purposes in a Fabric based
# network. Typically certificates provisioning is done in a separate process outside of the
# runtime network. Fabric-CA is a special certificate authority that provides a REST APIs for
# dynamic certificate management (enroll, revoke, re-enroll). The following section is only for
# Fabric-CA servers.
certificateAuthorities:
- ca.org1.hf.chainhero.io
#
# List of orderers to send transaction and channel create/update requests to. For the time
# being only one orderer is needed. If more than one is defined, which one get used by the
# SDK is implementation specific. Consult each SDK's documentation for its handling of orderers.
#
orderers:
orderer.hf.chainhero.io:
url: localhost:7050
# these are standard properties defined by the gRPC library
# they will be passed in as-is to gRPC client constructor
grpcOptions:
ssl-target-name-override: orderer.hf.chainhero.io
# These parameters should be set in coordination with the keepalive policy on the server,
# as incompatible settings can result in closing of connection.
# When duration of the 'keep-alive-time' is set to 0 or less the keep alive client parameters are disabled
keep-alive-time: 0s
keep-alive-timeout: 20s
keep-alive-permit: false
fail-fast: false
# allow-insecure will be taken into consideration if address has no protocol defined, if true then grpc or else grpcs
allow-insecure: false
tlsCACerts:
# Certificate location absolute path
path: ${GOPATH}/src/github.com/chainHero/heroes-service/fixtures/crypto-config/ordererOrganizations/hf.chainhero.io/tlsca/tlsca.hf.chainhero.io-cert.pem
#
# List of peers to send various requests to, including endorsement, query
# and event listener registration.
#
peers:
peer0.org1.hf.chainhero.io:
# this URL is used to send endorsement and query requests
url: localhost:7051
# eventUrl is only needed when using eventhub (default is delivery service)
eventUrl: localhost:7053
grpcOptions:
ssl-target-name-override: peer0.org1.hf.chainhero.io
# These parameters should be set in coordination with the keepalive policy on the server,
# as incompatible settings can result in closing of connection.
# When duration of the 'keep-alive-time' is set to 0 or less the keep alive client parameters are disabled
keep-alive-time: 0s
keep-alive-timeout: 20s
keep-alive-permit: false
fail-fast: false
# allow-insecure will be taken into consideration if address has no protocol defined, if true then grpc or else grpcs
allow-insecure: false
tlsCACerts:
# Certificate location absolute path
path: ${GOPATH}/src/github.com/chainHero/heroes-service/fixtures/crypto-config/peerOrganizations/org1.hf.chainhero.io/tlsca/tlsca.org1.hf.chainhero.io-cert.pem
peer1.org1.hf.chainhero.io:
# this URL is used to send endorsement and query requests
url: localhost:8051
# eventUrl is only needed when using eventhub (default is delivery service)
eventUrl: localhost:8053
grpcOptions:
ssl-target-name-override: peer1.org1.hf.chainhero.io
# These parameters should be set in coordination with the keepalive policy on the server,
# as incompatible settings can result in closing of connection.
# When duration of the 'keep-alive-time' is set to 0 or less the keep alive client parameters are disabled
keep-alive-time: 0s
keep-alive-timeout: 20s
keep-alive-permit: false
fail-fast: false
# allow-insecure will be taken into consideration if address has no protocol defined, if true then grpc or else grpcs
allow-insecure: false
tlsCACerts:
# Certificate location absolute path
path: ${GOPATH}/src/github.com/chainHero/heroes-service/fixtures/crypto-config/peerOrganizations/org1.hf.chainhero.io/tlsca/tlsca.org1.hf.chainhero.io-cert.pem
#
# Fabric-CA is a special kind of Certificate Authority provided by Hyperledger Fabric which allows
# certificate management to be done via REST APIs. Application may choose to use a standard
# Certificate Authority instead of Fabric-CA, in which case this section would not be specified.
#
certificateAuthorities:
ca.org1.hf.chainhero.io:
url: http://localhost:7054
# Fabric-CA supports dynamic user enrollment via REST APIs. A "root" user, a.k.a registrar, is
# needed to enroll and invoke new users.
httpOptions:
verify: false
registrar:
enrollId: admin
enrollSecret: adminpw
# [Optional] The optional name of the CA.
caName: ca.org1.hf.chainhero.io
tlsCACerts:
# Certificate location absolute path
path: ${GOPATH}/src/github.com/chainHero/heroes-service/fixtures/crypto-config/peerOrganizations/org1.hf.chainhero.io/ca/ca.org1.hf.chainhero.io-cert.pem
entityMatchers:
peer:
- pattern: (\w*)peer0.org1.hf.chainhero.io(\w*)
urlSubstitutionExp: localhost:7051
eventUrlSubstitutionExp: localhost:7053
sslTargetOverrideUrlSubstitutionExp: peer0.org1.hf.chainhero.io
mappedHost: peer0.org1.hf.chainhero.io
- pattern: (\w*)peer1.org1.hf.chainhero.io(\w*)
urlSubstitutionExp: localhost:8051
eventUrlSubstitutionExp: localhost:8053
sslTargetOverrideUrlSubstitutionExp: peer1.org1.hf.chainhero.io
mappedHost: peer1.org1.hf.chainhero.io
orderer:
- pattern: (\w*)orderer.hf.chainhero.io(\w*)
urlSubstitutionExp: localhost:7050
sslTargetOverrideUrlSubstitutionExp: orderer.hf.chainhero.io
mappedHost: orderer.hf.chainhero.io
certificateAuthorities:
- pattern: (\w*)ca.org1.hf.chainhero.io(\w*)
urlSubstitutionExp: http://localhost:7054
mappedHost: ca.org1.hf.chainhero.io
Le fichier de configuration est aussi disponible ici : config.yaml
b. Initialisation
Nous ajoutons un nouveau dossier nommé blockchain qui contiendra toute l’interface qui communique avec le réseau. Nous verrons le Fabric SDK Go uniquement
mkdir $GOPATH/src/github.com/chainHero/heroes-service/blockchain
Maintenant, nous ajoutons un nouveau fichier nommé setup.go:
vi $GOPATH/src/github.com/chainHero/heroes-service/blockchain/setup.gopackage blockchain
import (
"fmt"
mspclient "github.com/hyperledger/fabric-sdk-go/pkg/client/msp"
"github.com/hyperledger/fabric-sdk-go/pkg/client/resmgmt"
"github.com/hyperledger/fabric-sdk-go/pkg/common/errors/retry"
"github.com/hyperledger/fabric-sdk-go/pkg/common/providers/msp"
"github.com/hyperledger/fabric-sdk-go/pkg/core/config"
"github.com/hyperledger/fabric-sdk-go/pkg/fabsdk"
"github.com/pkg/errors"
)
// FabricSetup implementation
type FabricSetup struct {
ConfigFile string
OrgID string
OrdererID string
ChannelID string
ChainCodeID string
initialized bool
ChannelConfig string
ChaincodeGoPath string
ChaincodePath string
OrgAdmin string
OrgName string
UserName string
admin *resmgmt.Client
sdk *fabsdk.FabricSDK
}
// Initialize reads the configuration file and sets up the client, chain and event hub
func (setup *FabricSetup) Initialize() error {
// Add parameters for the initialization
if setup.initialized {
return errors.New("sdk already initialized")
}
// Initialize the SDK with the configuration file
sdk, err := fabsdk.New(config.FromFile(setup.ConfigFile))
if err != nil {
return errors.WithMessage(err, "failed to create SDK")
}
setup.sdk = sdk
fmt.Println("SDK created")
// The resource management client is responsible for managing channels (create/update channel)
resourceManagerClientContext := setup.sdk.Context(fabsdk.WithUser(setup.OrgAdmin), fabsdk.WithOrg(setup.OrgName))
if err != nil {
return errors.WithMessage(err, "failed to load Admin identity")
}
resMgmtClient, err := resmgmt.New(resourceManagerClientContext)
if err != nil {
return errors.WithMessage(err, "failed to create channel management client from Admin identity")
}
setup.admin = resMgmtClient
fmt.Println("Ressource management client created")
// The MSP client allow us to retrieve user information from their identity, like its signing identity which we will need to save the channel
mspClient, err := mspclient.New(sdk.Context(), mspclient.WithOrg(setup.OrgName))
if err != nil {
return errors.WithMessage(err, "failed to create MSP client")
}
adminIdentity, err := mspClient.GetSigningIdentity(setup.OrgAdmin)
if err != nil {
return errors.WithMessage(err, "failed to get admin signing identity")
}
req := resmgmt.SaveChannelRequest{ChannelID: setup.ChannelID, ChannelConfigPath: setup.ChannelConfig, SigningIdentities: []msp.SigningIdentity{adminIdentity}}
txID, err := setup.admin.SaveChannel(req, resmgmt.WithOrdererEndpoint(setup.OrdererID))
if err != nil || txID.TransactionID == "" {
return errors.WithMessage(err, "failed to save channel")
}
fmt.Println("Channel created")
// Make admin user join the previously created channel
if err = setup.admin.JoinChannel(setup.ChannelID, resmgmt.WithRetry(retry.DefaultResMgmtOpts), resmgmt.WithOrdererEndpoint(setup.OrdererID)); err != nil {
return errors.WithMessage(err, "failed to make admin join channel")
}
fmt.Println("Channel joined")
fmt.Println("Initialization Successful")
setup.initialized = true
return nil
}
func (setup *FabricSetup) CloseSDK() {
setup.sdk.Close()
}Le fichier est disponible ici : blockchain/setup.go
À ce stade, nous avons seulement initialisé un client qui communiquera avec un pair, un AC et un client. Nous avons également fait un nouveau canal et connecté ce pair à ce canal. Voir les commentaires dans le code pour plus d’informations.
c. Test
Pour s’assurer que le client a réussi à initialiser tous ses composants, nous ferons un test simple avec le réseau lancé. Pour ce faire, nous devons écrire le code Go. Comme nous n’avons pas de fichier principal, nous devons en ajouter un :
cd $GOPATH/src/github.com/chainHero/heroes-service && \
vi main.go
package main
import (
"fmt"
"github.com/chainHero/heroes-service/blockchain"
"os"
)
func main() {
// Definition of the Fabric SDK properties
fSetup := blockchain.FabricSetup{
// Network parameters
OrdererID: "orderer.hf.chainhero.io",
// Channel parameters
ChannelID: "chainhero",
ChannelConfig: os.Getenv("GOPATH") + "/src/github.com/chainHero/heroes-service/fixtures/artifacts/chainhero.channel.tx",
// Chaincode parameters
ChainCodeID: "heroes-service",
ChaincodeGoPath: os.Getenv("GOPATH"),
ChaincodePath: "github.com/chainHero/heroes-service/chaincode/",
OrgAdmin: "Admin",
OrgName: "org1",
ConfigFile: "config.yaml",
// User parameters
UserName: "User1",
}
// Initialization of the Fabric SDK from the previously set properties
err := fSetup.Initialize()
if err != nil {
fmt.Printf("Unable to initialize the Fabric SDK: %v\n", err)
return
}
// Close SDK
defer fSetup.CloseSDK()
}Le fichier est disponible ici : main.go
Comme vous pouvez le voir, nous avons corrigé le GOPATH de l’environnement s’il n’est pas réglé. Nous aurons besoin de cette fonctionnalité pour compiler le chaincode (nous verrons cela à l’étape suivante).
La dernière chose à faire, avant de commencer la compilation, est d’utiliser un répertoire vendor qui contiendra toutes nos dépendances. Dans notre GOPATH, nous avons Fabric SDK Go et peut-être d’autres projets. Lorsque nous allons essayer de compiler notre application,Golang cherche les dépendances dans notre GOPATH, mais il vérifie d'abord s’il y a un dossier vendor dans le projet. Si la dépendance est satisfaite, alors Golang ne va pas chercher dans GOPATH ou GOROOT. Ceci est très utile lors de l’utilisation de plusieurs versions différentes d’une dépendance (certains conflits peuvent survenir, comme plusieurs définitions de BCCSP dans notre cas). Nous allons gérer cela en utilisant un outil comme dep pour aplatir ces dépendances dans le répertoire vendor.
Lorsque vous avez installé les dépendances du SDK, DEP a été automatiquement installé. Si ce n’est pas le cas, vous pouvez l’installer en lisant les instructions disponibles ici : dep installation
Créez un fichier nommé Gopkg.toml and copiez ceci dedans:
cd $GOPATH/src/github.com/chainHero/heroes-service && \
vi Gopkg.toml
ignored = ["github.com/chainHero/heroes-service/chaincode"]
[[constraint]]
# Release v1.0.0-alpha4
name = "github.com/hyperledger/fabric-sdk-go"
revision = "a906355f73d060d7bf95874a9e90dc17589edbb3"C’est une contrainte pour dep afin de spécifier que dans notre fournisseur, nous voulons le SDK Go à une version spécifique.
Enregistrez le fichier, puis exécutez cette commande pour synchroniser le répertoire vendor avec les dépendances de notre projet (cela peut prendre un certain temps) :
cd $GOPATH/src/github.com/chainHero/heroes-service && \
dep ensure
Maintenant nous pouvons compiler notre application:
cd $GOPATH/src/github.com/chainHero/heroes-service && \
go build
Après un certain temps, un nouveau binaire nommé main apparaîtra à la racine du projet. Essayez de démarrer le binaire comme ceci :
cd $GOPATH/src/github.com/chainHero/heroes-service && \
./heroes-service
À ce stade, cela ne fonctionnera pas parce qu’il n’y a pas de réseau déployé avec lequel le SDK peut communiquer. Nous allons d’abord démarrer le réseau, puis relancer l’application :
cd $GOPATH/src/github.com/chainHero/heroes-service/fixtures && \
docker-compose up -d && \
cd .. && \
./heroes-service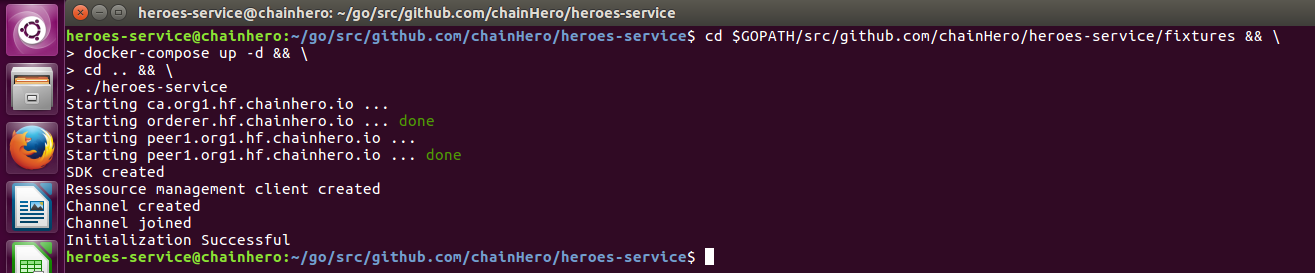
Note: vous devez voir “Initialization Successful”. Si ce n’est pas le cas, alors quelque chose n'a pas marché.
Très bien ! Nous venons donc d’initialiser le SDK avec notre réseau local. Dans la prochaine étape, nous allons interagir avec un chaincode.
d. Nettoyage et Makefile
Le Fabric SDK génère des fichiers, comme des certificats, des binaires et des fichiers temporaires. Fermer le réseau ne nettoiera pas complètement votre environnement et lorsque vous devrez le redémarrer, ces fichiers seront réutilisés pour éviter le processus de building. Pour le développement, vous pouvez les garder pour tester rapidement, mais pour un vrai test, vous devez tout nettoyer et commencer dès le début.
Comment nettoyer mon environnement ?
-
Coupez votre réseau:
cd $GOPATH/src/github.com/chainhero-website/heroes-service/fixtures && docker-compose down -
Supprimez les stockages d'informations d'authentification (défini dans le fichier de config, dans la section
client.credentialStore):rm -rf /tmp/heroes-service-* -
Supprimez certains conteneurs et images de Docker non générés par la commande
docker-compose:docker rm -f -v `docker ps -a --no-trunc | grep "heroes-service" | cut -d ' ' -f 1` 2>/dev/null and docker rmi `docker images --no-trunc | grep "heroes-service" | cut -d ' ' -f 1` 2>/dev/null
Comment être plus efficace ?
Nous pouvons automatiser toutes ces tâches en une seule étape. Le processus de build et de démarrage peut également être automatisé. Pour ce faire, nous créerons un Makefile. Premièrement, assurez-vous d’avoir l’outil :
make --version
Si make n'est pas installé, entre cette commande (Ubuntu):
sudo apt install make
Puis créez un fichier nommé Makefile à la racine du projet avec ce contenu :
cd $GOPATH/src/github.com/chainHero/heroes-service && \
vi Makefile
.PHONY: all dev clean build env-up env-down run

all: clean build env-up run

dev: build run

##### BUILD
build:
	@echo "Build ..."
	@dep ensure
	@go build
	@echo "Build done"

##### ENV
env-up:
	@echo "Start environment ..."
	@cd fixtures && docker-compose up --force-recreate -d
	@echo "Environment up"

env-down:
	@echo "Stop environment ..."
	@cd fixtures && docker-compose down
	@echo "Environment down"

##### RUN
run:
	@echo "Start app ..."
	@./heroes-service

##### CLEAN
clean: env-down
	@echo "Clean up ..."
	@rm -rf /tmp/heroes-service-* heroes-service
	@docker rm -f -v `docker ps -a --no-trunc | grep "heroes-service" | cut -d ' ' -f 1` 2>/dev/null || true
	@docker rmi `docker images --no-trunc | grep "heroes-service" | cut -d ' ' -f 1` 2>/dev/null || true
	@echo "Clean up done"
Le fichier est disponible ici : Makefile
Maintenant avec la tâche all:
- tout l’environnement sera nettoyé,
- puis notre programme Go sera compilé,
- après quoi le réseau sera déployé et
- l’application sera enfin opérationnelle.
Pour l’utiliser, allez dans la racine du projet et entrez la commande make :
-
Tâche
all:makeoumake all -
Tâche
clean: nettoie tout et désactive le réseau (make clean) -
Tâche
build: fait un build de l'application (make build) -
Tâche
env-up: active le réseau (make env-up) - ...
e. Installation et instanciation du chaincode
À cette étape, nous pouvons presque utiliser le système blockchain. Mais pour l’instant, nous n’avons pas encore mis en place de chaincode (contrat intelligent) qui traitera les requêtes de notre application. Tout d’abord, créons un nouveau répertoire nommé chaincode et ajoutons un nouveau fichier nommé main.go (c’est le principal point d’entrée de notre contrat intelligent) :
cd $GOPATH/src/github.com/chainHero/heroes-service && \
mkdir chaincode && \
vi chaincode/main.go
package main
import (
"fmt"
"github.com/hyperledger/fabric/core/chaincode/shim"
pb "github.com/hyperledger/fabric/protos/peer"
)
// HeroesServiceChaincode implementation of Chaincode
type HeroesServiceChaincode struct {
}
// Init of the chaincode
// This function is called only one when the chaincode is instantiated.
// So the goal is to prepare the ledger to handle future requests.
func (t *HeroesServiceChaincode) Init(stub shim.ChaincodeStubInterface) pb.Response {
fmt.Println("########### HeroesServiceChaincode Init ###########")
// Get the function and arguments from the request
function, _ := stub.GetFunctionAndParameters()
// Check if the request is the init function
if function != "init" {
return shim.Error("Unknown function call")
}
// Put in the ledger the key/value hello/world
err := stub.PutState("hello", []byte("world"))
if err != nil {
return shim.Error(err.Error())
}
// Return a successful message
return shim.Success(nil)
}
// Invoke
// All future requests named invoke will arrive here.
func (t *HeroesServiceChaincode) Invoke(stub shim.ChaincodeStubInterface) pb.Response {
fmt.Println("########### HeroesServiceChaincode Invoke ###########")
// Get the function and arguments from the request
function, args := stub.GetFunctionAndParameters()
// Check whether it is an invoke request
if function != "invoke" {
return shim.Error("Unknown function call")
}
// Check whether the number of arguments is sufficient
if len(args) < 1 {
return shim.Error("The number of arguments is insufficient.")
}
// In order to manage multiple type of request, we will check the first argument.
// Here we have one possible argument: query (every query request will read in the ledger without modification)
if args[0] == "query" {
return t.query(stub, args)
}
return shim.Error("Unknown action, check the first argument")
}
// query
// Every readonly functions in the ledger will be here
func (t *HeroesServiceChaincode) query(stub shim.ChaincodeStubInterface, args []string) pb.Response {
fmt.Println("########### HeroesServiceChaincode query ###########")
// Check whether the number of arguments is sufficient
if len(args) < 2 {
return shim.Error("The number of arguments is insufficient.")
}
// Like the Invoke function, we manage multiple type of query requests with the second argument.
// We also have only one possible argument: hello
if args[1] == "hello" {
// Get the state of the value matching the key hello in the ledger
state, err := stub.GetState("hello")
if err != nil {
return shim.Error("Failed to get state of hello")
}
// Return this value in response
return shim.Success(state)
}
// If the arguments given don’t match any function, we return an error
return shim.Error("Unknown query action, check the second argument.")
}
func main() {
// Start the chaincode and make it ready for futures requests
err := shim.Start(new(HeroesServiceChaincode))
if err != nil {
fmt.Printf("Error starting Heroes Service chaincode: %s", err)
}
}Le fichier est disponible ici : chaincode/main.go
Note: le chaincode n’est pas vraiment lié à l’application, nous pouvons avoir un dépôt pour l’application et un autre pour le chaincode. Pour votre information, le chaincode peut également aujourd’hui être écrit dans d’autres langues comme Java.
Pour l’instant, le chaincode ne fait rien d’extraordinaire, il suffit de mettre la clé/valeur hello/world dans le ledger à l’initialisation. En outre, il y a une fonction que nous pouvons invoquer par un appel : query hello. Cette fonction obtient l’état du ledger, i.e. hello et le donne en réponse. Nous testerons ça à l’étape suivante, après avoir installé et instancié le chaincode avec succès.
Pour installer et instancier le chaincode, nous devons ajouter du code dans l’application. Éditez le fichier blockchain/setup.go avec les lignes suivantes :
package blockchain

import (
	"fmt"
	"github.com/hyperledger/fabric-sdk-go/pkg/client/channel"
	"github.com/hyperledger/fabric-sdk-go/pkg/client/event"
	mspclient "github.com/hyperledger/fabric-sdk-go/pkg/client/msp"
	"github.com/hyperledger/fabric-sdk-go/pkg/client/resmgmt"
	"github.com/hyperledger/fabric-sdk-go/pkg/common/errors/retry"
	"github.com/hyperledger/fabric-sdk-go/pkg/common/providers/msp"
	"github.com/hyperledger/fabric-sdk-go/pkg/core/config"
	packager "github.com/hyperledger/fabric-sdk-go/pkg/fab/ccpackager/gopackager"
	"github.com/hyperledger/fabric-sdk-go/pkg/fabsdk"
	"github.com/hyperledger/fabric-sdk-go/third_party/github.com/hyperledger/fabric/common/cauthdsl"
	"github.com/pkg/errors"
)

// FabricSetup implementation
type FabricSetup struct {
	ConfigFile      string
	OrgID           string
	OrdererID	string
	ChannelID       string
	ChainCodeID     string
	initialized     bool
	ChannelConfig   string
	ChaincodeGoPath string
	ChaincodePath   string
	OrgAdmin        string
	OrgName         string
	UserName        string
	client          *channel.Client
	admin           *resmgmt.Client
	sdk             *fabsdk.FabricSDK
	event           *event.Client
}
[...]

func (setup *FabricSetup) InstallAndInstantiateCC() error {

	// Create the chaincode package that will be sent to the peers
	ccPkg, err := packager.NewCCPackage(setup.ChaincodePath, setup.ChaincodeGoPath)
	if err != nil {
		return errors.WithMessage(err, "failed to create chaincode package")
	}
	fmt.Println("ccPkg created")

	// Install example cc to org peers
	installCCReq := resmgmt.InstallCCRequest{Name: setup.ChainCodeID, Path: setup.ChaincodePath, Version: "0", Package: ccPkg}
	_, err = setup.admin.InstallCC(installCCReq, resmgmt.WithRetry(retry.DefaultResMgmtOpts))
	if err != nil {
		return errors.WithMessage(err, "failed to install chaincode")
	}
	fmt.Println("Chaincode installed")

	// Set up chaincode policy
	ccPolicy := cauthdsl.SignedByAnyMember([]string{"org1.hf.chainhero.io"})

	resp, err := setup.admin.InstantiateCC(setup.ChannelID, resmgmt.InstantiateCCRequest{Name: setup.ChainCodeID, Path: setup.ChaincodeGoPath, Version: "0", Args: [][]byte{[]byte("init")}, Policy: ccPolicy})
	if err != nil || resp.TransactionID == "" {
		return errors.WithMessage(err, "failed to instantiate the chaincode")
	}
	fmt.Println("Chaincode instantiated")

	// Channel client is used to query and execute transactions
	clientContext := setup.sdk.ChannelContext(setup.ChannelID, fabsdk.WithUser(setup.UserName))
	setup.client, err = channel.New(clientContext)
	if err != nil {
		return errors.WithMessage(err, "failed to create new channel client")
	}
	fmt.Println("Channel client created")

	// Creation of the client which will enables access to our channel events
	setup.event, err = event.New(clientContext)
	if err != nil {
		return errors.WithMessage(err, "failed to create new event client")
	}
	fmt.Println("Event client created")

	fmt.Println("Chaincode Installation & Instantiation Successful")
	return nil
}
[...]
Le fichier est disponible ici : blockchain/setup.go
Astuce : prenez soin de la version chaincode, si vous voulez mettre à jour votre chaincode, incrémentez le numéro de version défini aux lignes 103 et 113 de ce fichier setup.go. Sinon le réseau gardera le même chaincode.
Nous devons maintenant modifier notre fichier main.go afin d’appeler notre nouvelle fonction
cd $GOPATH/src/github.com/chainHero/heroes-service && \
vi main.go
package main
import (
"fmt"
"github.com/chainHero/heroes-service/blockchain"
"os"
)
func main() {
// Definition of the Fabric SDK properties
fSetup := blockchain.FabricSetup{
// Network parameters
OrdererID: "orderer.hf.chainhero.io",
// Channel parameters
ChannelID: "chainhero",
ChannelConfig: os.Getenv("GOPATH") + "/src/github.com/chainHero/heroes-service/fixtures/artifacts/chainhero.channel.tx",
// Chaincode parameters
ChainCodeID: "heroes-service",
ChaincodeGoPath: os.Getenv("GOPATH"),
ChaincodePath: "github.com/chainHero/heroes-service/chaincode/",
OrgAdmin: "Admin",
OrgName: "org1",
ConfigFile: "config.yaml",
// User parameters
UserName: "User1",
}
[...]
// Install and instantiate the chaincode
err = fSetup.InstallAndInstantiateCC()
if err != nil {
fmt.Printf("Unable to install and instantiate the chaincode: %v\n", err)
return
}
}Le fichier est disponible ici : main.go
Nous pouvons le tester, uniquement avec la commande make de l’étape précédente :
cd $GOPATH/src/github.com/chainHero/heroes-service && \
make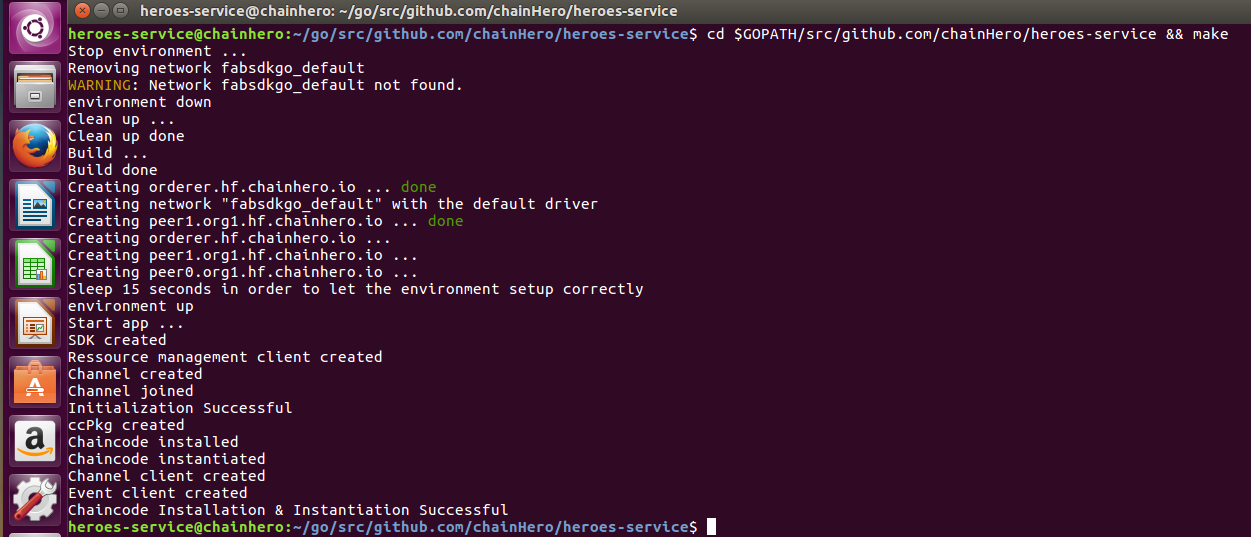
Astuce : l’installation et l’instanciation n’ont pas besoin d’être exécutées à chaque démarrage de l’application, seulement lorsque nous mettons à jour le chaincode (et la version chaincode). Une solution est de fournir un argument lorsque nous lançons l’application pour dire de faire cette procédure supplémentaire avant de passer. Dans ce tutoriel, nous allons nettoyer l’environnement chaque fois que nous ne nous soucions pas vraiment de cela.
f. Chaincode query
Comme une base de données, le chaincode est branché et prêt à répondre. Essayons la requête hello.
Nous mettrons toutes les fonctions de requête dans un nouveau fichier nommé query.go dans le dossier blockchain :
cd $GOPATH/src/github.com/chainHero/heroes-service && \
vi blockchain/query.go
package blockchain
import (
"fmt"
"github.com/hyperledger/fabric-sdk-go/pkg/client/channel"
)
// QueryHello query the chaincode to get the state of hello
func (setup *FabricSetup) QueryHello() (string, error) {
// Prepare arguments
var args []string
args = append(args, "invoke")
args = append(args, "query")
args = append(args, "hello")
response, err := setup.client.Query(channel.Request{ChaincodeID: setup.ChainCodeID, Fcn: args[0], Args: [][]byte{[]byte(args[1]), []byte(args[2])}})
if err != nil {
return "", fmt.Errorf("failed to query: %v", err)
}
return string(response.Payload), nil
}Le fichier est disponible ici : blockchain/query.go
Vous pouvez ajouter l’appel à cette nouvelle fonction dans le fichier main.go:
cd $GOPATH/src/github.com/chainHero/heroes-service && \
vi main.go
func main() {
[...]
// Query the chaincode
response, err := fSetup.QueryHello()
if err != nil {
fmt.Printf("Unable to query hello on the chaincode: %v\n", err)
} else {
fmt.Printf("Response from the query hello: %s\n", response)
}
}Le fichier est disponible ici : main.go
Essayons :
cd $GOPATH/src/github.com/chainHero/heroes-service && \
make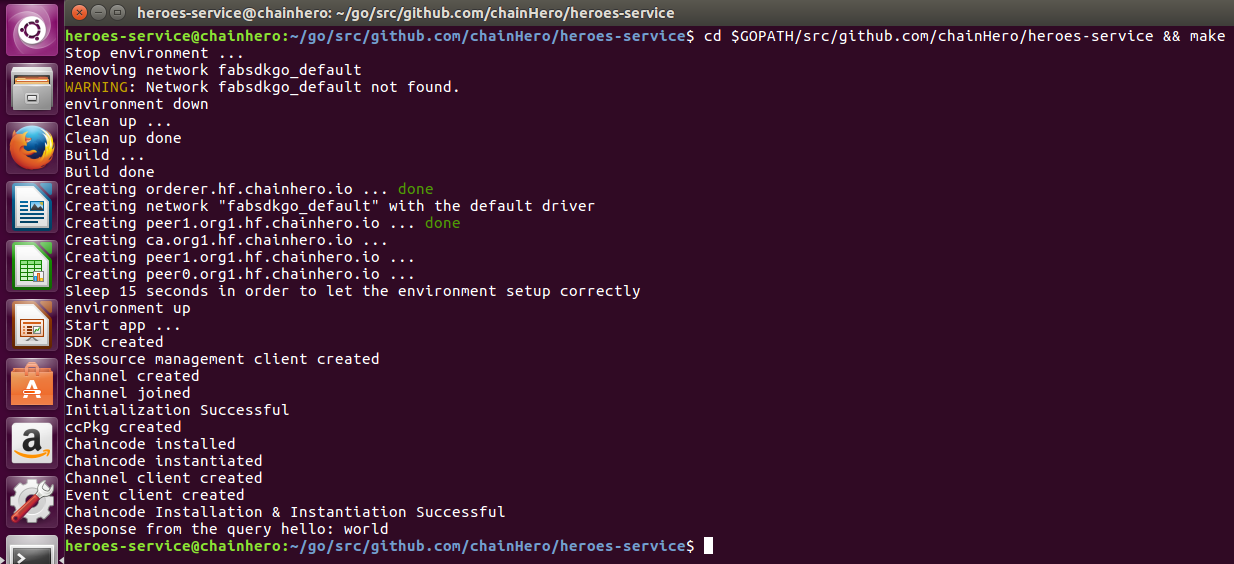
g. Changer l'état du ledger
La prochaine chose à réaliser pour passer en revue les bases du Fabric SDK Go est de faire une demande au chaincode afin de changer l’état du ledger.
Tout d’abord, nous allons ajouter cette capacité dans le chaincode. Éditez le fichier chaincode/main.go :
[...]

// Invoke
// All future requests named invoke will arrive here.
func (t *HeroesServiceChaincode) Invoke(stub shim.ChaincodeStubInterface) pb.Response {
	fmt.Println("########### HeroesServiceChaincode Invoke ###########")

	// Get the function and arguments from the request
	function, args := stub.GetFunctionAndParameters()

	// Check whether it is an invoke request
	if function != "invoke" {
		return shim.Error("Unknown function call")
	}

	// Check whether the number of arguments is sufficient
	if len(args) < 1 {
		return shim.Error("The number of arguments is insufficient.")
	}

	// In order to manage multiple type of request, we will check the first argument.
	// Here we have one possible argument: query (every query request will read in the ledger without modification)
	if args[0] == "query" {
		return t.query(stub, args)
	}

	// The update argument will manage all update in the ledger
	if args[0] == "invoke" {
		return t.invoke(stub, args)
	}

	// If the arguments given don’t match any function, we return an error
	return shim.Error("Unknown action, check the first argument")
}

[...]

// invoke
// Every functions that read and write in the ledger will be here
func (t *HeroesServiceChaincode) invoke(stub shim.ChaincodeStubInterface, args []string) pb.Response {
	fmt.Println("########### HeroesServiceChaincode invoke ###########")

	if len(args) < 2 {
		return shim.Error("The number of arguments is insufficient.")
	}

	// Check if the ledger key is "hello" and process if it is the case. Otherwise it returns an error.
	if args[1] == "hello" && len(args) == 3 {

		// Write the new value in the ledger
		err := stub.PutState("hello", []byte(args[2]))
		if err != nil {
			return shim.Error("Failed to update state of hello")
		}

		// Notify listeners that an event "eventInvoke" have been executed (check line 19 in the file invoke.go)
		err = stub.SetEvent("eventInvoke", []byte{})
		if err != nil {
			return shim.Error(err.Error())
		}

		// Return this value in response
		return shim.Success(nil)
	}

	// If the arguments given don’t match any function, we return an error
	return shim.Error("Unknown invoke action, check the second argument.")
}

[...]
Le fichier est disponible ici : chaincode/main.go
Du côté application, nous ajoutons une nouvelle fonction pour faire l’invocation du chaincode. Ajoutez un fichier nommé invoke.go dans le dossier blockchain :
cd $GOPATH/src/github.com/chainHero/heroes-service && \
vi blockchain/invoke.go
package blockchain
import (
"fmt"
"github.com/hyperledger/fabric-sdk-go/pkg/client/channel"
"time"
)
// InvokeHello
func (setup *FabricSetup) InvokeHello(value string) (string, error) {
// Prepare arguments
var args []string
args = append(args, "invoke")
args = append(args, "invoke")
args = append(args, "hello")
args = append(args, value)
eventID := "eventInvoke"
// Add data that will be visible in the proposal, like a description of the invoke request
transientDataMap := make(map[string][]byte)
transientDataMap["result"] = []byte("Transient data in hello invoke")
reg, notifier, err := setup.event.RegisterChaincodeEvent(setup.ChainCodeID, eventID)
if err != nil {
return "", err
}
defer setup.event.Unregister(reg)
// Create a request (proposal) and send it
response, err := setup.client.Execute(channel.Request{ChaincodeID: setup.ChainCodeID, Fcn: args[0], Args: [][]byte{[]byte(args[1]), []byte(args[2]), []byte(args[3])}, TransientMap: transientDataMap})
if err != nil {
return "", fmt.Errorf("failed to move funds: %v", err)
}
// Wait for the result of the submission
select {
case ccEvent := <-notifier:
fmt.Printf("Received CC event: %s\n", ccEvent)
case <-time.After(time.Second * 20):
return "", fmt.Errorf("did NOT receive CC event for eventId(%s)", eventID)
}
return string(response.TransactionID), nil
}Le fichier est disponible ici : blockchain/invoke.go
Vous pouvez ensuite ajouter l’appel à cette fonction dans le fichier main.go:
cd $GOPATH/src/github.com/chainHero/heroes-service && \
vi main.go
func main() {
[...]
// Query the chaincode
response, err := fSetup.QueryHello()
if err != nil {
fmt.Printf("Unable to query hello on the chaincode: %v\n", err)
} else {
fmt.Printf("Response from the query hello: %s\n", response)
}
// Invoke the chaincode
txId, err := fSetup.InvokeHello("chainHero")
if err != nil {
fmt.Printf("Unable to invoke hello on the chaincode: %v\n", err)
} else {
fmt.Printf("Successfully invoke hello, transaction ID: %s\n", txId)
}
// Query again the chaincode
response, err = fSetup.QueryHello()
if err != nil {
fmt.Printf("Unable to query hello on the chaincode: %v\n", err)
} else {
fmt.Printf("Response from the query hello: %s\n", response)
}
}Le fichier est disponible ici : main.go
Essayons :
cd $GOPATH/src/github.com/chainHero/heroes-service && \
make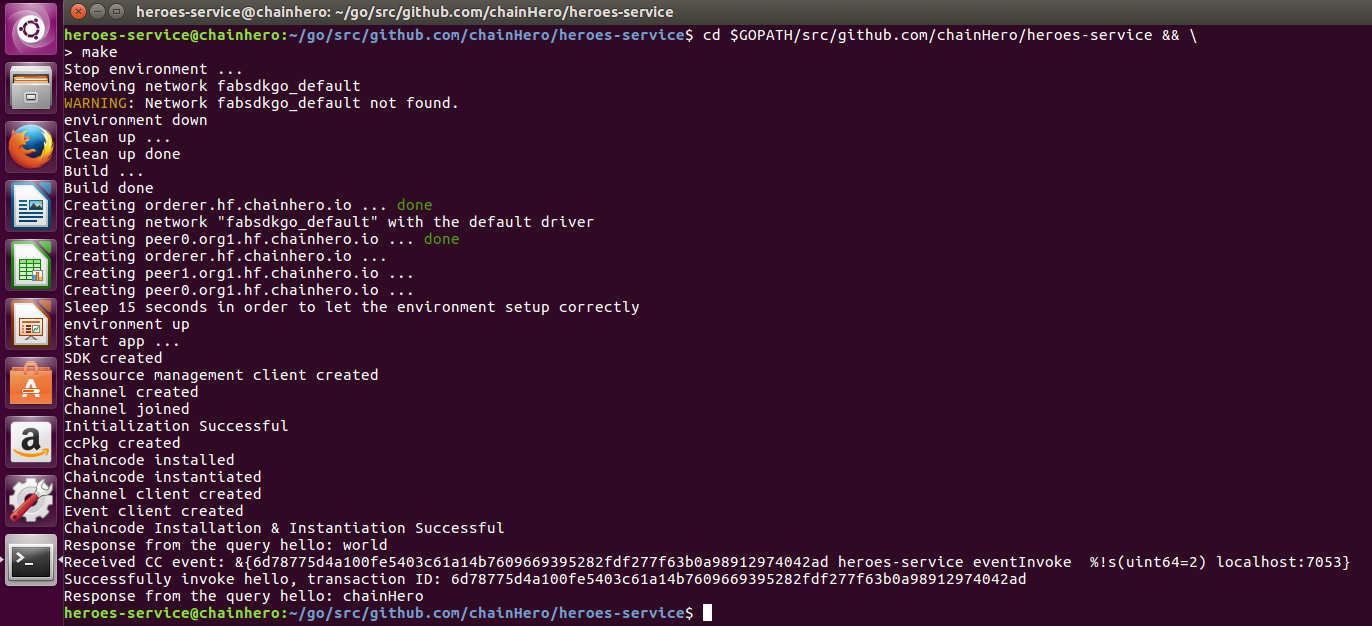
Note : ce message d'erreur peut apparaître : endorsement validation failed: Endorser Client Status Code: (3) ENDORSEMENT_MISMATCH. Description: ProposalResponsePayloads do not match.Puisque nous avons deux pairs, le SDK envoie sa demande aux deux directement et s’il reçoit une réponse différente (ce qui est tout à fait possible parce que c’est un système asynchrone) alors il renvoie cette erreur. La meilleure chose à faire dans ces cas est de recommencer.
6. Faire tout ceci dans une application web
Nous pouvons également rendre cela utilisable pour tout utilisateur. Le meilleur choix est une application web et nous avons de la chance parce que le langage Go fournit nativement un serveur web qui gère les requêtes HTTP et qui modélise le HTML.
Pour l’instant, nous avons seulement deux actions différentes : la requête et l’invocation de la valeur hello. Faisons deux pages HTML pour chaque action. Nous ajoutons un répertoire web avec trois autres répertoires :
-
web/templates: contient toutes les pages HTML (templates) -
web/assets: contient tout le CSS, Javascript, Polices, Images… -
web/controllers: contient toutes les fonctions qui rendront les templates
Nous utilisons le MVC (Model-View-Controller) pour le rendre plus lisible. Le modèle sera la partie blockchain, les vues sont des templates et les contrôleurs sont fournis par les fonctions dans le répertoire controllers.
Remplissez chacun d'entre eux avec le code approprié (nous avons également ajouté Bootstrap pour rendre le résultat un peu plus joli) :
-
web/templates/layout.html -
web/templates/home.html -
web/templates/request.html -
web/controllers/controller.go -
web/controllers/home.go -
web/controllers/request.go -
web/app.go -
web/assets
Enfin, nous modifions le fichier main.go afin d’utiliser l’interface web au lieu d’interroger directement la blockchain.
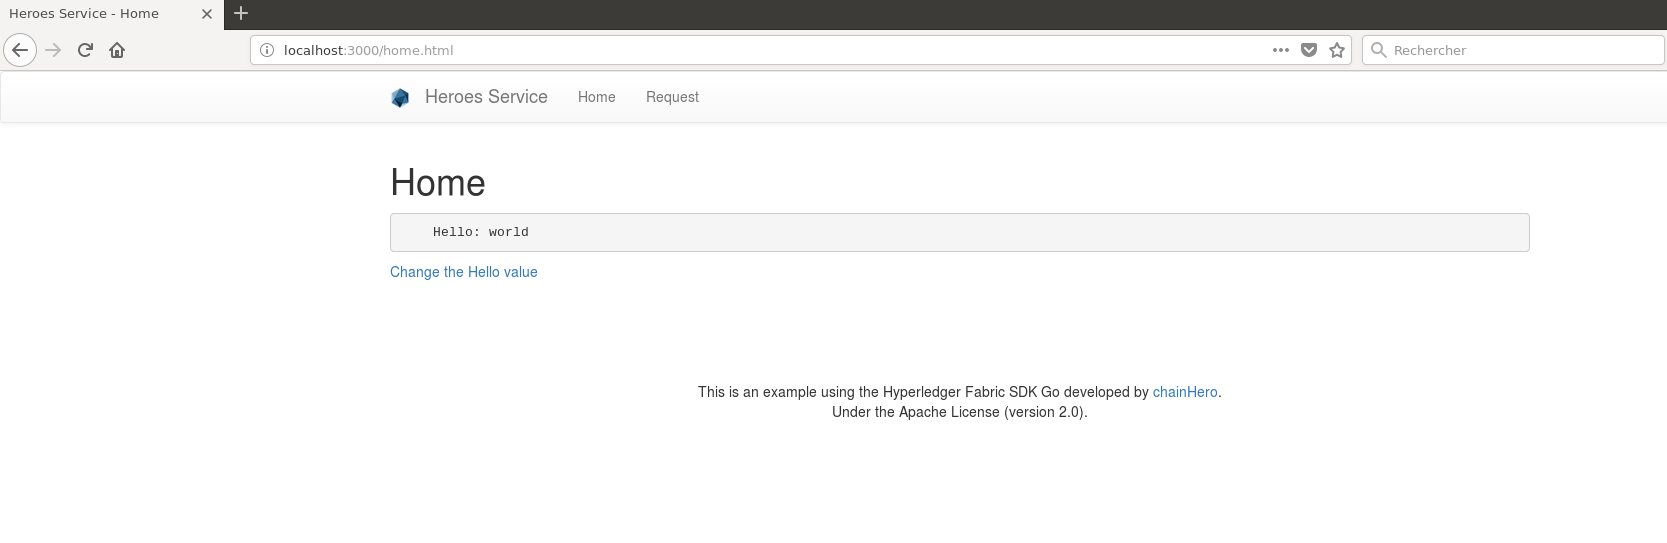
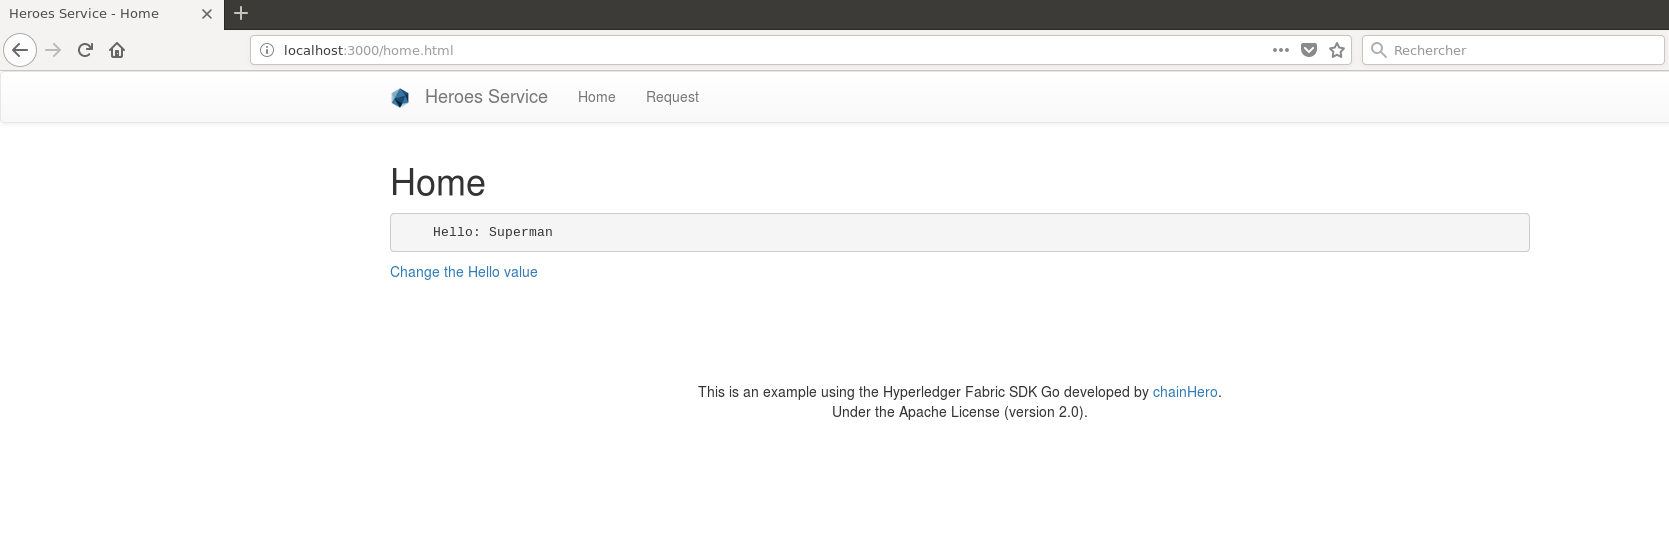
Lancez l'application et allez à l'URL localhost:3000/home.html:
cd $GOPATH/src/github.com/chainHero/heroes-service ; \
make
La page home effectue une requête dans la blockchain pour obtenir la valeur de la clé hello et l’afficher.
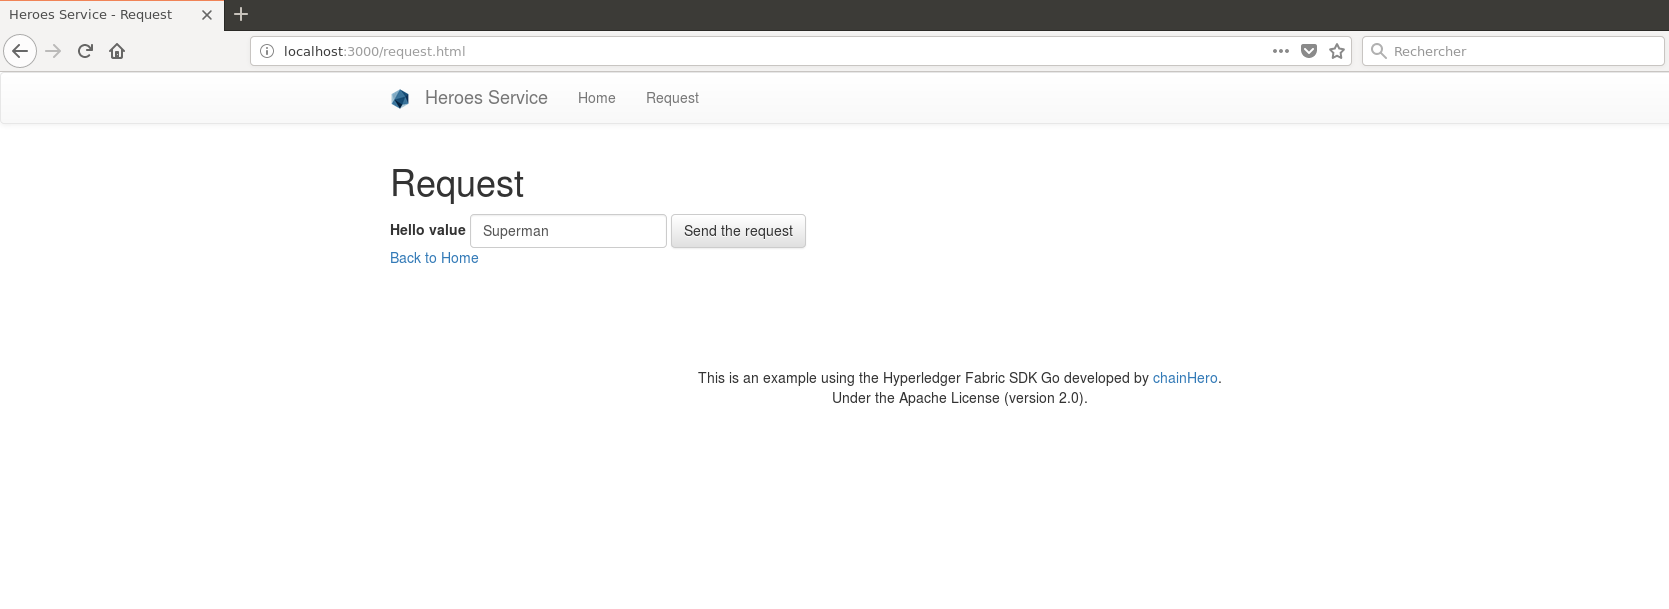
La page request contient un formulaire permettant de modifier la valeur hello.
Après un envoi réussi, l'ID de la transaction est donné.
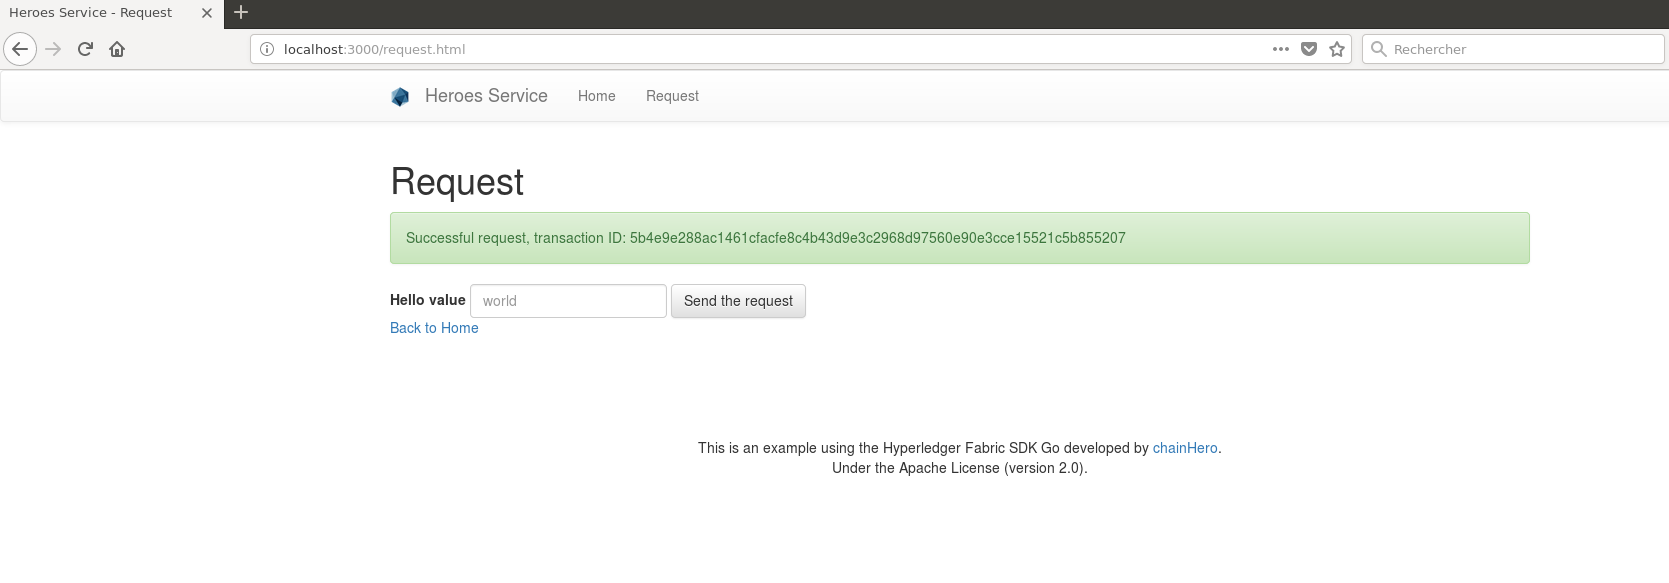
Nous pouvons voir le changement en retournant à la page home.
C’est la fin de la première partie. Une application plus complexe viendra prochainement.
7. Références
- site web Hyperledger
- documentation en ligne de Hyperledger Fabric
- Hyperledger Fabric sur github
- Hyperledger Fabric Certificate Authority sur github
- Hyperledger Fabric SDK Go sur github
- tests de Fabric SDK Go
- CLI: Un exemple de CLI pour Fabric construit avec le Go SDK.
